Acoustic Analysis of Bee Behavior – Part 2
Recognition Systems
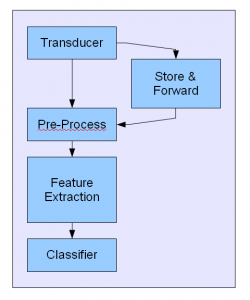
We have reviewed some of the biology behind hive sounds. Now, lets get to work building something that is useful in recognizing those bee sounds. Every recognition system consists of at least 3 to 5 components, shown schematically to the left. Click on the diagram to see a larger version of the drawing. The components include:
- Transducer – A transducer changes some natural property – like water temperature or electrical potential of a beating heart or wind speed – into an electrical signal. In this case, we are talking about a microphone that changes vibrations in the air into an analog electrical signal.
- Pre-Processor – A pre-processor typically attempts to remove noise that is in a signal. If we are recording sounds of bees, we might want to filter out the noise from nearby highway traffic. This step usually occurs before feature extraction. However, in our case, we will extract features first, then remove unwanted noises.
- Store & Forward – This is an optional step. In our case, we are going to record a sound and save it for later processing. In the future, I hope to find a way to process the sound in real-time so that storing the sound and forwarding it later will not be necessary.
- Feature Extraction – Features are simply short hand descriptions of a signal. In our case, features are frequency (vibrations per second) and amplitude (sound level) described over time.
- Classifier – A classifier considers a pattern of features and decides if it sufficiently resembles a previously recorded pattern. For example, we may want to design a classifier that recognizes the sound of a bee taking to flight.
Our initial recognition system will consist of each of these stages but will be contained in 3 parts:
- A computer. Any computer. I am using a Windows-XP-based dual-core desktop machine. This runs the software that performs pre-processing, feature extraction, and classification.
- A field recorder. The Zoom H1 is a high quality field recorder for $99. It captures stereo audio via Pulse Code Modulation to 24 bits & 96KHz – far superior to CD recordings – and saves the recording to a 32GB microSDHC flash media. It’s flat frequency response is shown at right. It will run continuously for 10 hours on a single AA battery. A couple years ago, you would pay several hundreds or thousands of dollars for the same capability. The H1 satisfies our transducer, pre-processor, and store & forward capability in a $99 package.
- Feature extraction and detection software. This is what we discuss next.
Acoustic Analysis and Detection Software
So far as I know, there is no acoustic analysis software written specifically for the amateur honey bee scientist. That should not be a big problem because there are some very fine open source and reasonably priced software written for other acoustic analysis applications. All of these can generate a sonogram or spectrograph of a sound. Some allow you to edit the image (erase noise!) and play it back. Some even perform sound detection (supposedly). There are more programs than what I have listed here.
- Music Information Retrieval Research (Marsyas)
- Animal (Bird, Bat, Whale, etc.) Field Studies (Avisoft Bioacoustics($), Sound Analysis Pro, Ishmael, Wildlife Acoustics($), SoundID($))
- Linguistics and Speech Analysis (Praat, Akustyk)
- Generic Music/Acoustic Analysis (Sonogram, Sonic Visualizer)
Am I missing a program that should be here?
Microphone Placement
How do you get a microphone into the middle of a hive without interrupting them? The Bromenshenk patent described in Section 1 suggests using a probe that is inserted into the side of the hive. This isn’t a bad approach as it allows you to use one microphone to record multiple hives (one at a time) just by unplugging a hole and inserting the probe. However, it is less optimum for 7×24 recordings because it violates the bee space and invites being plastered with propolis. And that would not be good for frequency response. In addition, the microphone will pick up every footfall as the bees walk on the probe, thinking it is a diving board.
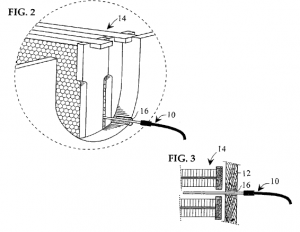
My proposal (offered to the dear reader here for free, unencumbered by patents) is to build an acoustically transparent, brass wire cloth housing in the middle of a hive body frame. The bees cannot walk on the sensor itself and it respects bee space. Parts are listed below:
- One hive body frame with plastic foundation
- One desktop microphone. The microphone is an inexpensive electret condenser microphone used for Skype or computer voice dictation. It should have a 3.5mm audio-in jack (not USB), 100Hz – 16kHz response, and ~2K ohm impedance. I got mine for $8 at Fry’s (a favorite hacker hangout in Sunnyvale, California and now in Georgia).
- Brass wire cloth. You can get the fine brass wire cloth I use at most good art supply stores.
- Wood, staples, beer
Then read each of the following steps before actually building the microphone housing:
- Hack the plastic stand and housing away from the microphone component, wire, and 3.5mm male plug. That’s why we are called hackers! You should have only a little silver cylinder (microphone), 6 foot shielded wire, and plug.
- Cut a roughly 4″ tall x 3 wide ” rectangle out of the top, middle of a plastic (not wax) foundation.
- Drill a hole into the top center of a deep hive body frame through which you can fish your microphone (see below). I also put a slot on the top of the frame from the hole to the ears (frame handles) in which to bury the wire and then wood putty it over. Put the foundation into that frame.
- Cut two sides consisting of two pieces of 1.0″ x 0.75″ x 3″ pine
- Cut a 1/4″ slot down the middle of each side of wood. This slot will fit over the 3/16″ thick plastic foundation.
- Cut a 11″ x 3″ piece of wire cloth. Starting at the top edge of frame, staple it to the frame, then to each of pieces of side wood, wrap it around the bottom, then staple it up the other side.
- In a loud voice say, “Oh, Shit! I forgot to put the microphone (and other electronics) in the !@&^#$% housing.
- Pry a couple staples off and insert microphone and (optional) temperature/humidity sensors. Re-staple.
- Crack open a beer and admire your handiwork.

Closeup of microphone housing
I did warn you to read every step first, didn’t I? The last thing I did before installing the frame was to file a 1/8″ deep round groove in the rear top of the hive body in which to snake the microphone wire out of the hive body without letting Small Hive Beetles or anything else squeeze through as well. You don’t need to plaster voids with wood putty. The bees will take care of that with their propolis.
After more than 6 months, I still have a wire housing that is free of propolis.
Current Progress
So I am currently recording bees with my H1 field recorder (it was on back order for over 2 months!). One discovery so far: when I knock on the side of a bee hive, it sounds like a rifle shot in the middle of the hive. No surprise there. The surprise is that the bees get quieter, not louder.
I have tried to record “bee taking off” sounds but without much luck. I have serious doubts about some of these granted bee patents. I think some of these patents will fall into the same category as perpetual motion machines and lighter than air vacuum dirigibles (click here – as an aside, this patent was granted for something that has never been built. The inventors, however, trust in the honey bee’s honey comb structure for strength in their vacuum balloons).
I am still looking for a frequency response detector. SoundID is supposed to have one. I would love to hear from you if you are knowledgeable in this field.
To be continued…
Please post your questions, comments, & suggestions related to this project here.


June 22, 2020 at 5:22 am
Hi there,
Firstable, a huge thank you for you researches. It’s really interesting and really helpfull for my current project.
I would like to build the same kind of set up for recording bees.
I’m wondering about the fabric I should use. You say “Brass wire cloth”.
I would like to know if you have some feedbacks about that. Is this fabric fine or do you think another would be more appropriate ?
I’m thinking about the sound of the bees on the fabric which may be heard as an extra hive sound.
Thanks again for your article, and thanks for your time.
All the best,
Maxime